How to Create CI/CD Pipelines in Jenkins: A Step-by-Step Guide

Continuous Integration and Continuous Delivery (CI/CD) pipelines are critical for automating and streamlining the software development process. Jenkins, as one of the most popular CI/CD tools, makes it easy to set up and manage these pipelines. In this guide, we’ll walk you through the process of creating a CI/CD pipeline in Jenkins, from start to finish.
Introduction
In today’s agile development environment, speed and reliability are crucial. CI/CD pipelines automate the integration, testing, and deployment of code changes, ensuring that your software is always in a releasable state. Jenkins is the tool of choice for many teams due to its flexibility, extensive plugin ecosystem, and ease of use. In this tutorial, we’ll show you how to create a Jenkins pipeline that can automate your build, test, and deployment processes.
What You’ll Need
Before we begin, make sure you have the following:
A running Jenkins server (if you haven’t set up Jenkins yet, follow our Jenkins setup guide)
Access to a version control system (e.g., GitHub, GitLab, Bitbucket)
A basic understanding of Jenkins pipelines and scripting
Step 1: Create a New Pipeline Project
Log in to Jenkins: Open your Jenkins dashboard by navigating to http://localhost:8080 or your server’s IP address.
Create a New Item: On the Jenkins dashboard, click on New Item.
Name Your Pipeline: Enter a name for your pipeline. Make sure it’s descriptive enough to identify the project.
Select Pipeline: Choose Pipeline from the list of item types and click OK.
Step 2: Configure the Pipeline
Once your pipeline project is created, you’ll need to configure it.
Define the Pipeline Script
Scroll Down to the Pipeline Section: In the project configuration page, scroll down to the Pipeline section.
Select Pipeline Script: You can define your pipeline in two ways:
Pipeline script: Write your pipeline script directly in the Jenkins UI.
Pipeline script from SCM: Pull your pipeline script from your version control system (recommended for larger projects).
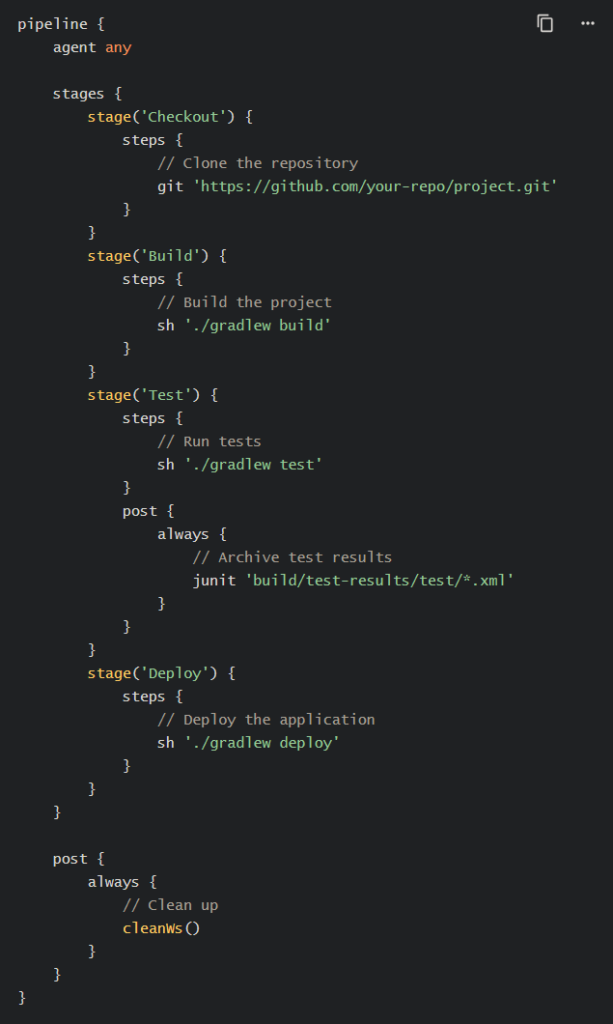
For this tutorial, we’ll use the Pipeline script option.
Lorem ipsum dolor sit amet, consectetur adipiscing elit. Ut elit tellus, luctus nec ullamcorper mattis, pulvinar dapibus leo.

Script Breakdown
Agent: Specifies where the pipeline will run.
agent anymeans it can run on any available agent.Stages: The pipeline is divided into stages, each representing a phase in the CI/CD process.
Checkout: Clones the repository from your version control system.
Build: Compiles the project.
Test: Runs automated tests and archives the results.
Deploy: Deploys the application.
Post: Contains actions that run at the end of the pipeline, such as cleaning up the workspace.
Step 3: Save and Build the Pipeline
Save Your Configuration: Once you’ve entered your pipeline script, click Save at the bottom of the configuration page.
Build the Pipeline: On your pipeline’s main page, click Build Now. Jenkins will run the pipeline as defined in your Jenkinsfile.
Step 4: Monitor the Pipeline
After triggering the build, Jenkins will execute each stage of your pipeline. You can monitor the progress and results from the Jenkins dashboard.
Blue Ocean (Optional)
For a more visual representation of your pipeline, Jenkins offers a plugin called Blue Ocean. It provides an intuitive interface for viewing and managing pipelines. To install and use Blue Ocean:
Install the Plugin: Go to Manage Jenkins > Manage Plugins. Search for Blue Ocean and install it.
Access Blue Ocean: Once installed, you can access Blue Ocean by clicking on the Open Blue Ocean link on the Jenkins dashboard.
Blue Ocean displays your pipeline stages in a visual pipeline view, making it easier to see what’s happening at each step.
Step 5: Automate Triggering the Pipeline
Jenkins allows you to automate the triggering of your pipeline based on various events, such as code commits or scheduled intervals.
Triggering on Git Commits
To trigger your pipeline every time a change is pushed to your Git repository:
Go to Project Configuration: Edit your pipeline project configuration.
Build Triggers Section: Scroll down to the Build Triggers section.
Enable Poll SCM: Check the Poll SCM option and enter a schedule using cron syntax (e.g., H/5 * * * * to poll every 5 minutes).
Webhook Integration: Alternatively, you can set up a webhook in your Git repository to notify Jenkins of changes instantly.
Scheduled Builds
If you prefer to run your pipeline at regular intervals:
Build Triggers Section: In the same Build Triggers section, enable the Build periodically option.
Set Schedule: Define a cron schedule for when the pipeline should run.
Step 6: Customize and Extend Your Pipeline
Once you have a basic pipeline set up, you can extend it to fit your specific needs:
Add More Stages: Introduce additional stages for linting, security checks, or deployment to different environments.
Parallel Execution: Run multiple stages in parallel to speed up the pipeline.
Notifications: Integrate Jenkins with Slack, email, or other communication tools to receive alerts on pipeline status.
Artifacts and Reports: Archive build artifacts and generate reports as part of your pipeline.
Conclusion
Creating a CI/CD pipeline in Jenkins is a powerful way to automate your software development process, ensuring that every change is integrated, tested, and deployed efficiently. With the steps outlined in this guide, you should be well on your way to setting up a robust CI/CD pipeline tailored to your project’s needs.
Jenkins’ flexibility allows for endless customization, making it a valuable tool in any DevOps toolkit. Whether you’re just starting or looking to optimize your existing processes, Jenkins can help you achieve faster and more reliable software delivery.

